Plantation Shutter Measuring and Installation Guide
Videos Guides Available Below!
View videos?
Installing plantation shutters may seem like a daunting task, especially if you’re not familiar with the process. That’s why we’ve put together this comprehensive plantation shutter installation guide to help you navigate the process with ease.
Our DIY kits come with everything you need to learn how to install your own plantation shutters, including step-by-step instructions and all the necessary hardware. For those who prefer a more hands-off approach, our fully assembled shutters can be installed by our team of experts for a hassle-free experience.
However, if you need further assistance undertaking plantation shutter installation, explore our DIY shutter measuring guide below:
Before you learn how to install plantation shutters, it is important to understand how to measure your space to ensure your shutters will fit perfectly. Explore the tips below on how to measure your space accurately the first time:
Always measure with a new tape measure
Always measure to the closest millimetre
Measure all windows, even though they appear to be identical in size and shape
Please note that there are three types of frames; L Frame recessed (In) fit, Z Frame recessed (In) fit, and L Frame (Out) face fit.
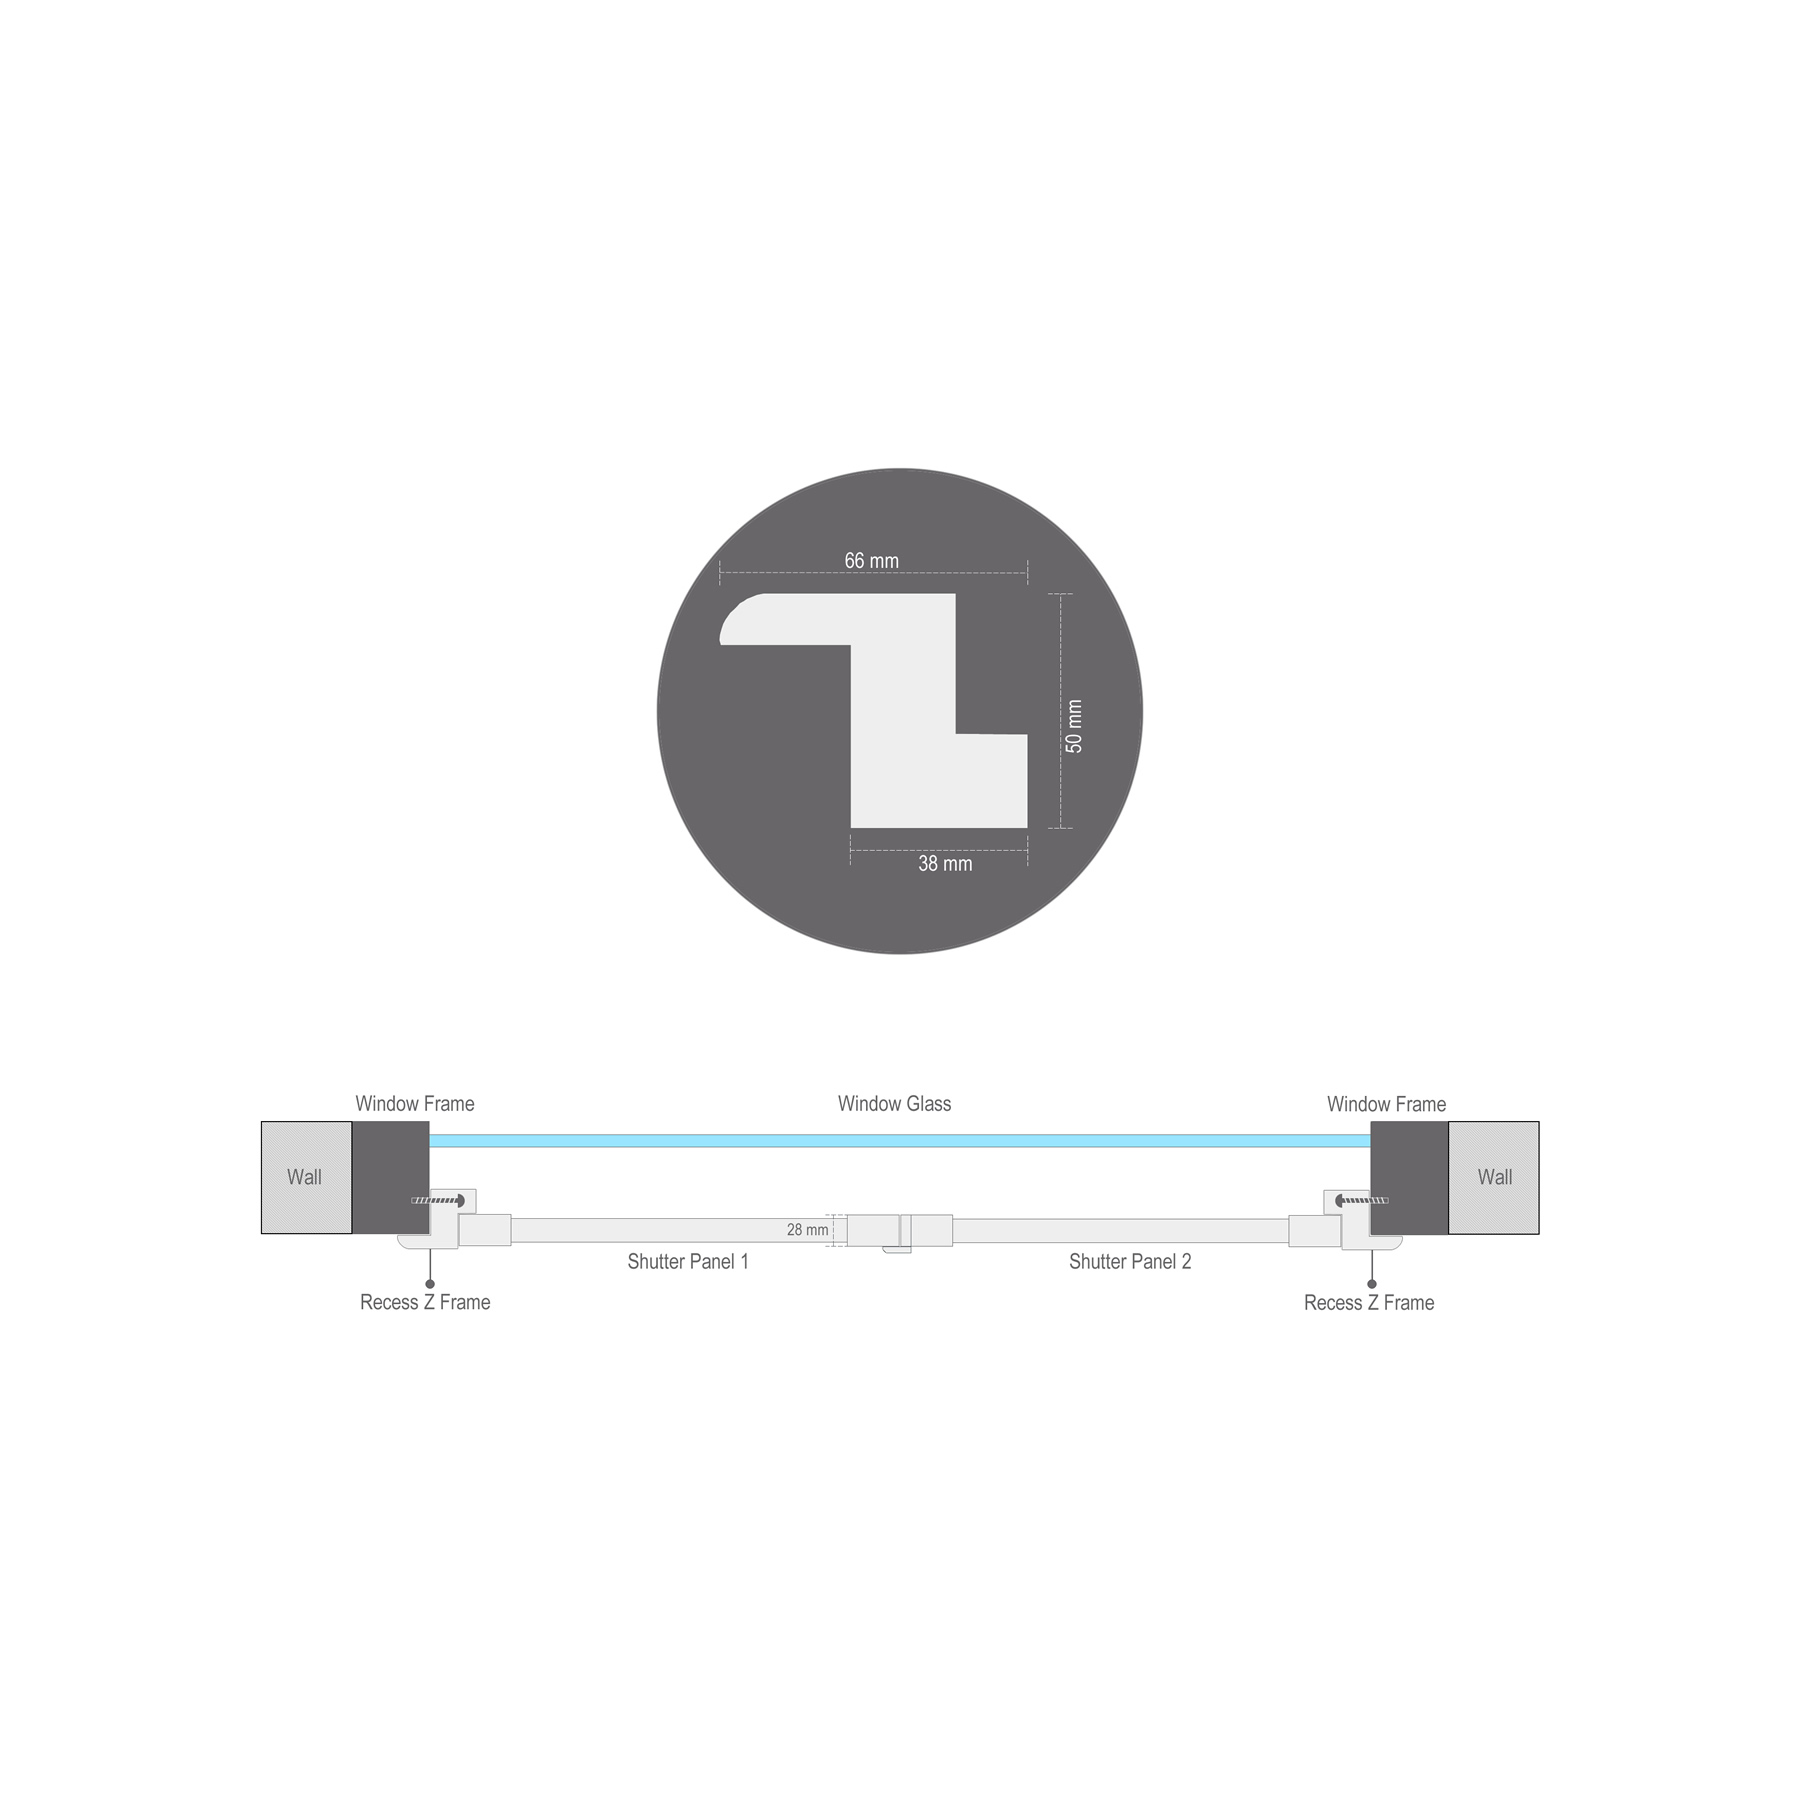
Recess Z Frame
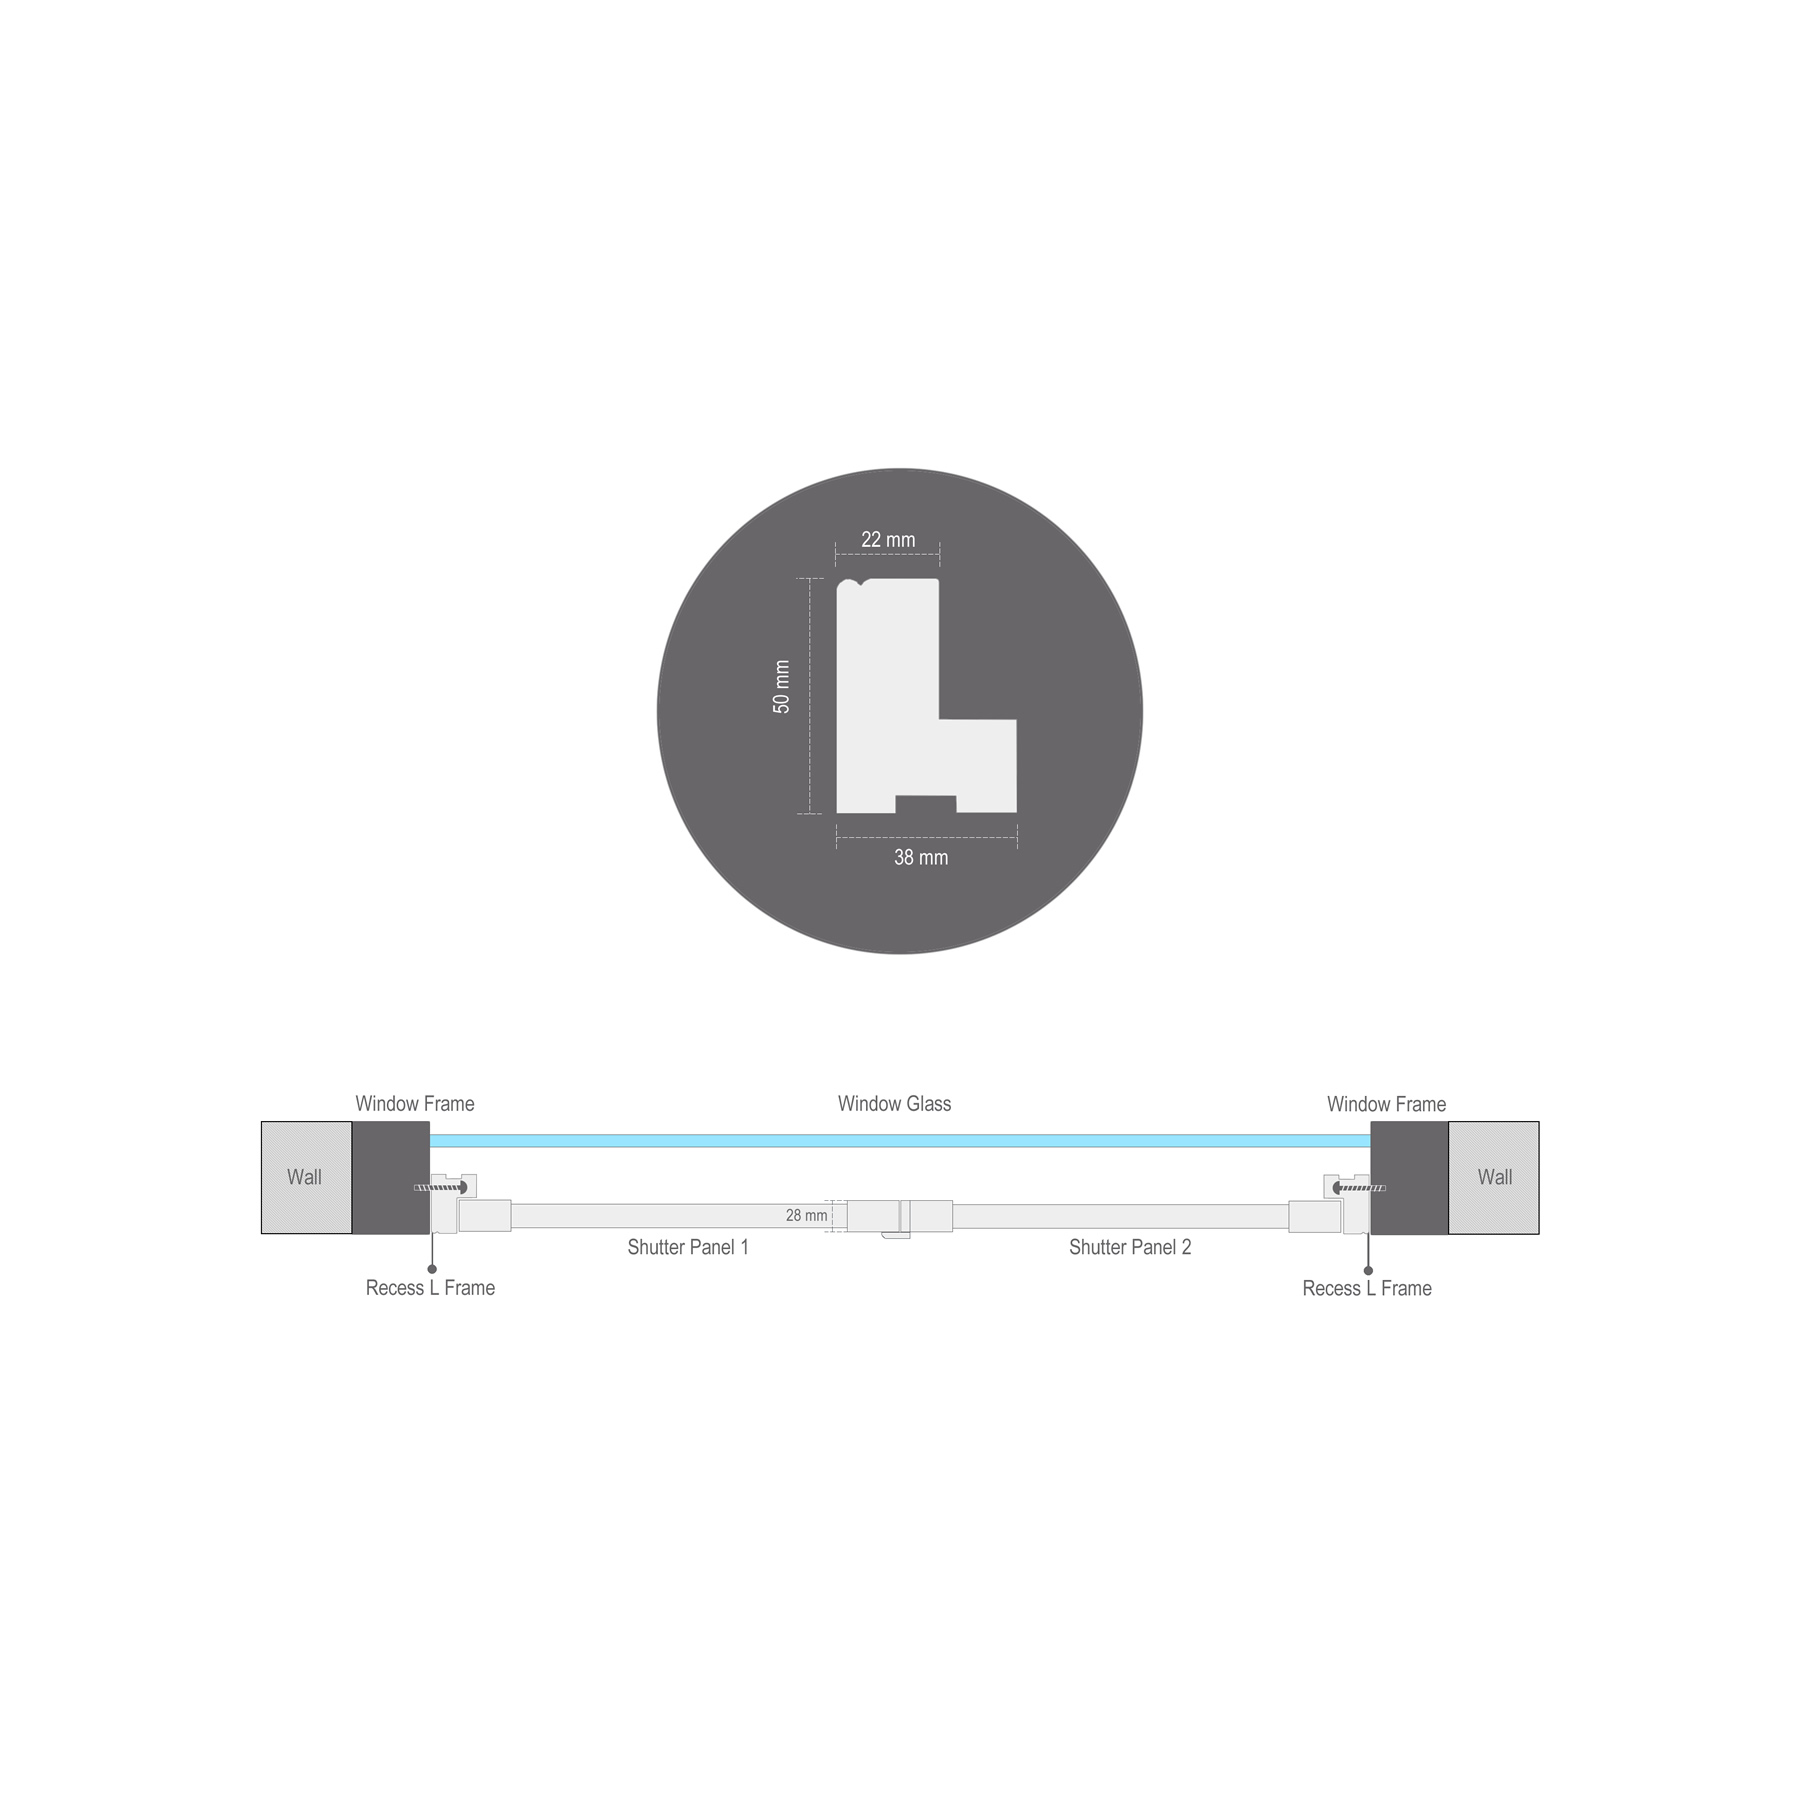
Recess L Frame
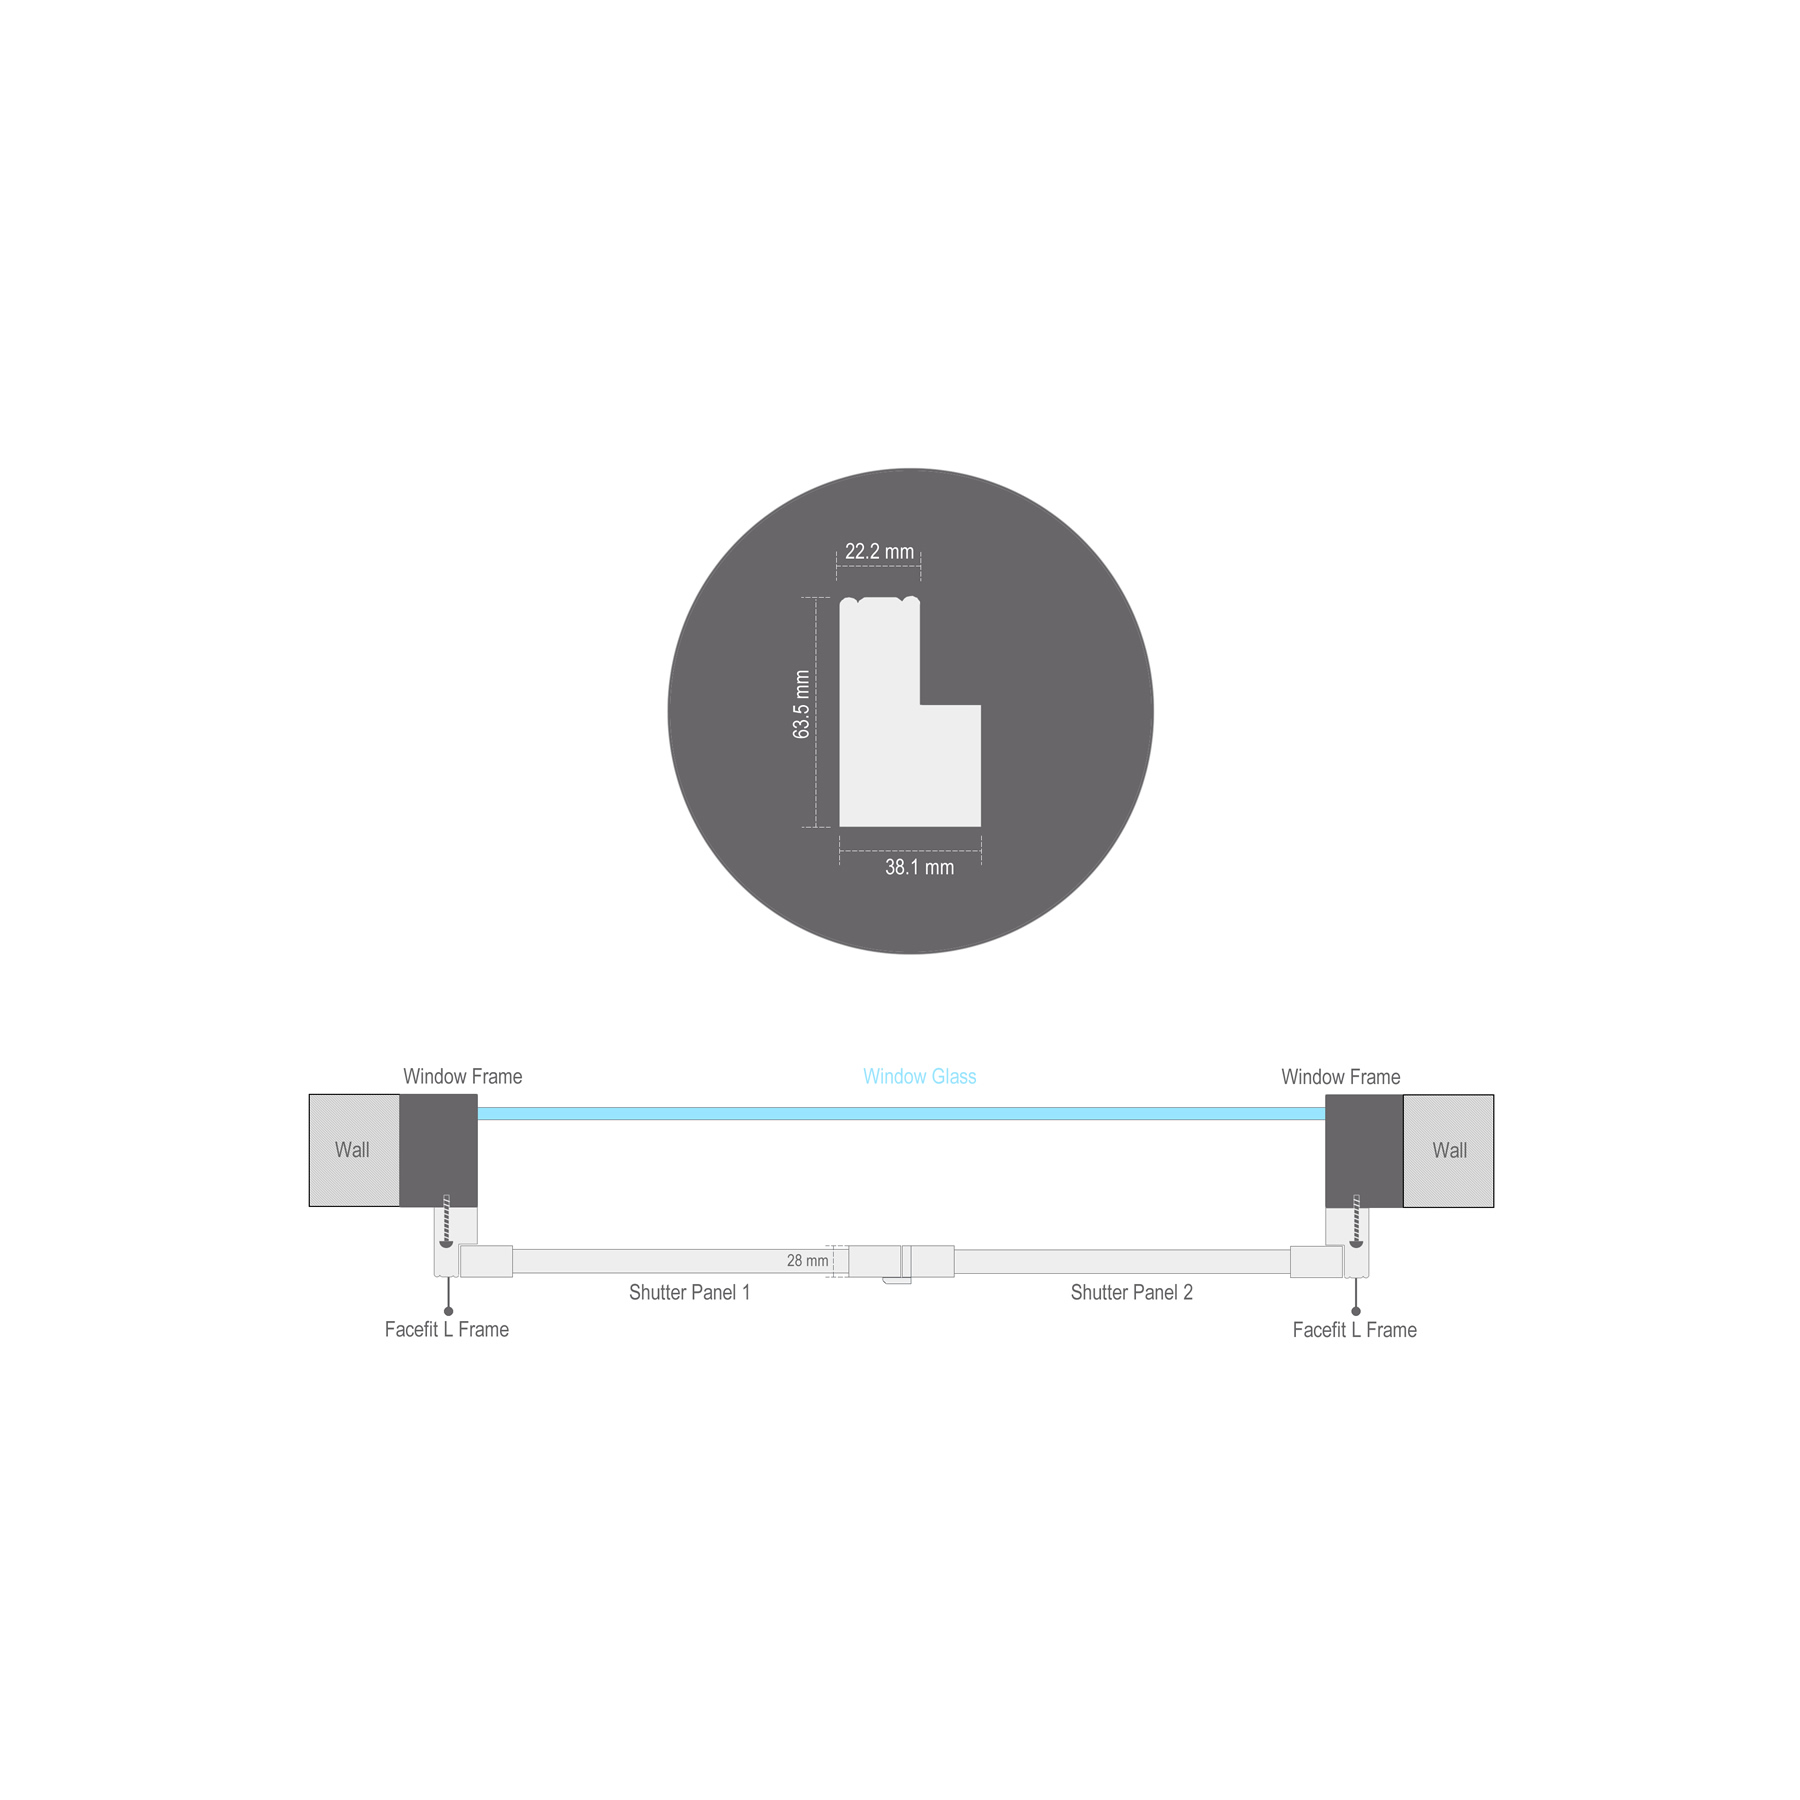
Facelift L Frame
Recess Z Frame
Recess L Frame
Facefit L Frame
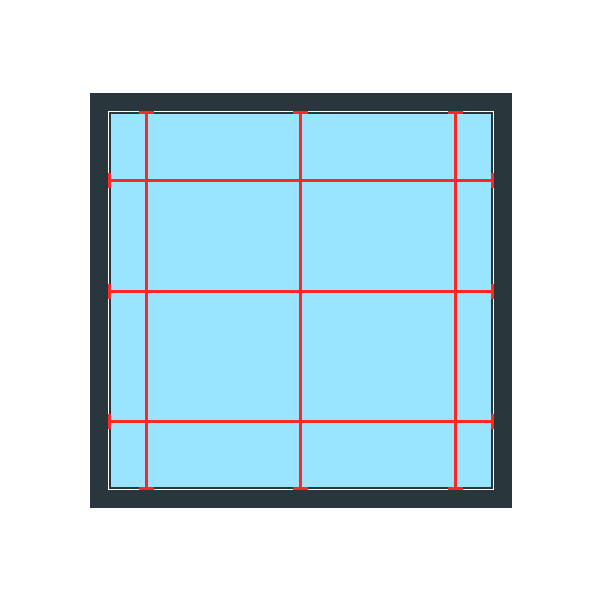
1.2 – Determine the Squareness of the Window
After taking the measurements of your window, you should next measure its squareness. When you do this, ensure that you are measuring diagonally from corner to corner. Should the difference between the two diagonals be greater than 6mm, a Face fit or a recessed Z Frame fit is highly recommended. Please see the image below for assistance.
Measure Squareness of Window
1.3 – Measuring Recessed (in) L and Z Frame Fit
After you take the measurements of the window and its shape, it’s important you take additional measurements if you are after a recessed L and/or Z Frame. See the notes below for more information:
Width – take three measurements at the top, middle and bottom of the window opening.
Drop – take three measurements at the left, centre, and right of the window opening
For recess fit provides the smallest width and height measurement.
Measuring Recess Fit
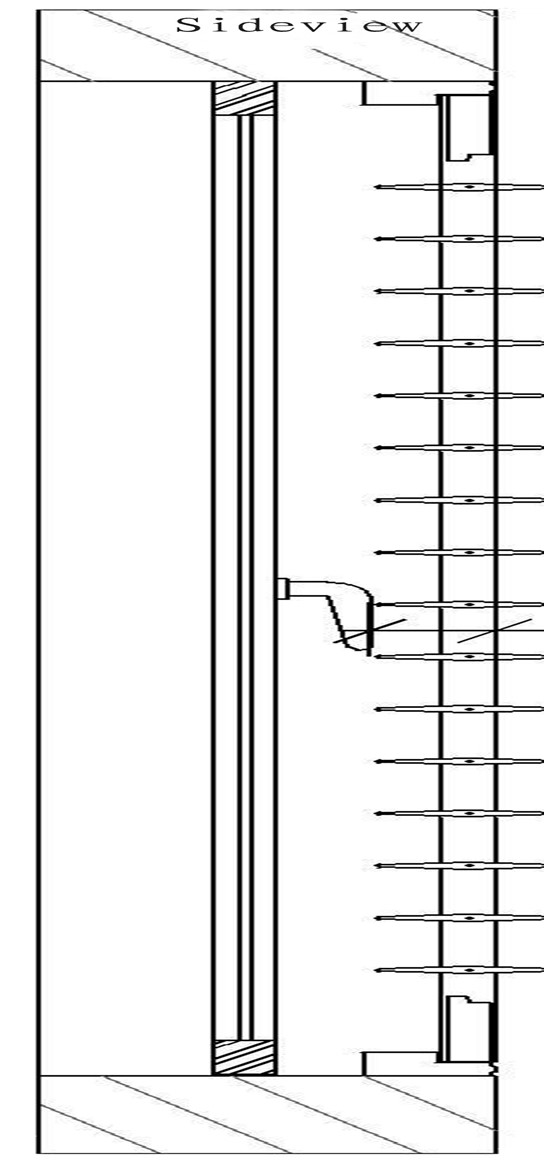
Side View
Blade Size
Clearview Tilt Rod
Minimum Depth
89 mm
68 mm
In some circumstances, window depth can be less than 50mm by using a mid rail at the position of hand bar. If there is a winder at the bottom of window blocked the bottom frame, then 3 sides frames (no bottom frame) is the option.
1.4 – Measuring L Frame Face Fit (Out)
After you take the measurements of the window and its shape, its important you take additional measurements if you’re after an L Frame face fit. See the notes below for more information:
Width: take three measurements from the edge of the architrave to the edge of the architrave at the top, middle and bottom on the window frame.
Drop: take three measurements from the top of the architrave to the bottom of the architrave at the left, centre, and right of the window opening
For Face fit (in)L frame, provide the largest width and height measurement.
Measure Squareness of Window
Please note that you need at least 25mm of flat surface to mount your shutter frame. If the architrave is over 70mm, then 65mm ML (medium L) frames are needed. otherwise, SL (standard L) frames work better.
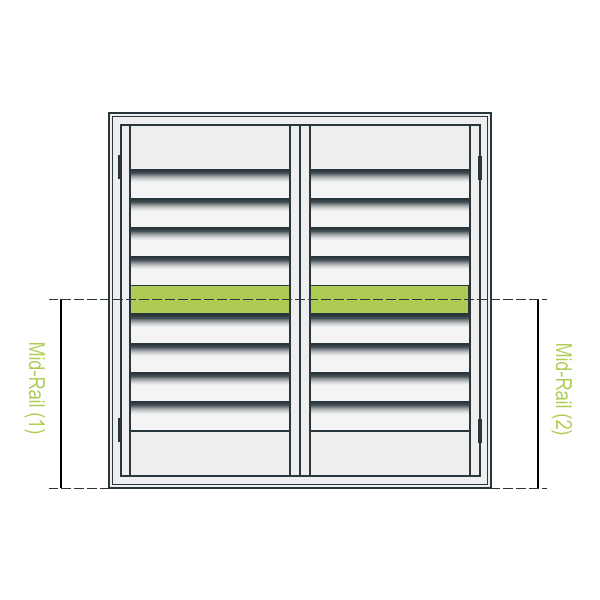
2.1 – How To Measure Your Mid-Rail Position
The next step is to measure your mid-rail position. Mid rails provide strength to your shutters and allow you to operate the top blades independently from the bottom blades.
When you are measuring your mid-rail position, please note the following:
Customers are agreed to give up warranty claims if panels over 1800mm for basswood and 1600mm for PVC without mid rails.
Extra charges may apply if more than one mid rail is needed within 1800mm.
The most common placement for a mid rail is in the exact centre of the panel.
It is also common to place the mid rail at a natural break.
For more information about how to measure specific frames, see below:
Recessed L & Z Frame: Measure from the bottom of the inside of your window frame to the centre point of the desired location of the mid rail.
Face Fit L Frame: Measure from the bottom of the architrave to the centre point of the desired location of the mid rail.
Measuring Recess Fit Mid Rail Position
Measuring Face Fit Mid Rail Position
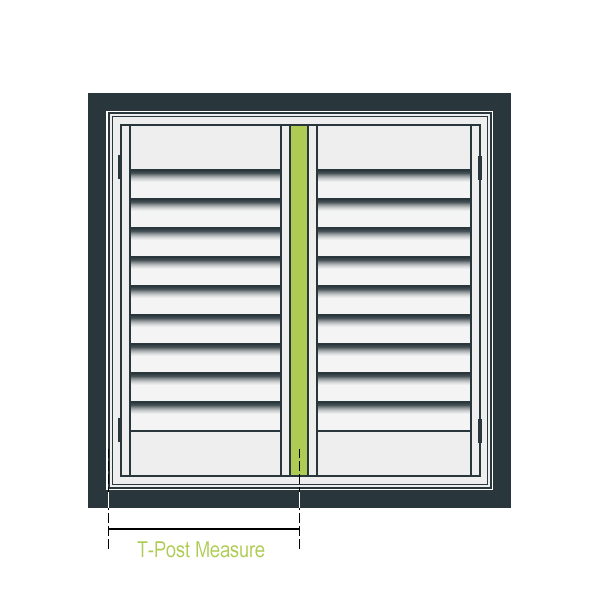
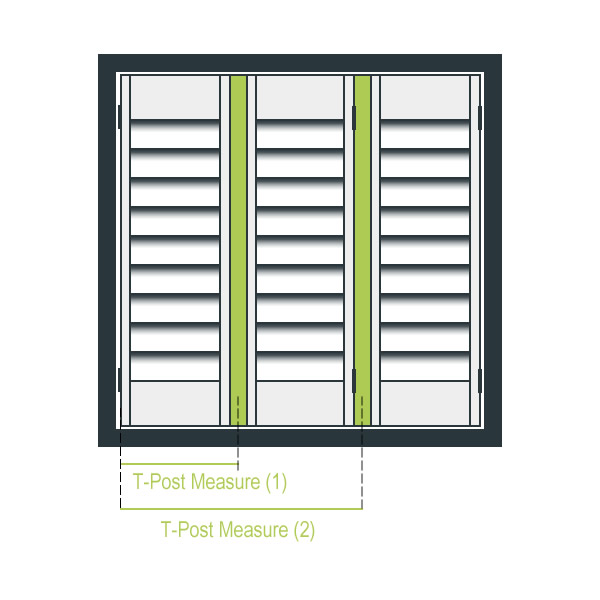
2.2 – How To Measure Your T-Posts Position
A T-post is a vertical bar that is used to support and connect two or more panels of a plantation shutter. The T-post is placed in the centre of the opening where the panels meet. It is important to measure your T-Post’s position as it allows the panels to pivot smoothly and independently.
The maximum individual Panel Width is 950mm for basswood and 750mm for PVC. For larger windows, T posts can be used with any frame type where the size of the window requires three, four or six panels etc. They are used to divide windows vertically to match window design and cover large spaces.
When ordering your shutters, you can choose Standard Panel widths – all panels are made of equal sizes or ‘Custom’. Below are measuring instructions if you choose custom sizes.
2.2.1 – Recessed (In) Fit – L Frame & Z Frame
Explore below the different options for T-Post positioning on a Recessed (In) Fit – L Frame & Z Frame.
Measuring Recessed Fit T-Post Position
Measuring Face Fit T-Post Position Multi
T-Post 1 = Inside edge of window frame to centre of first T-Post
T-Post 2 = Inside edge of window frame to centre of second T-Post
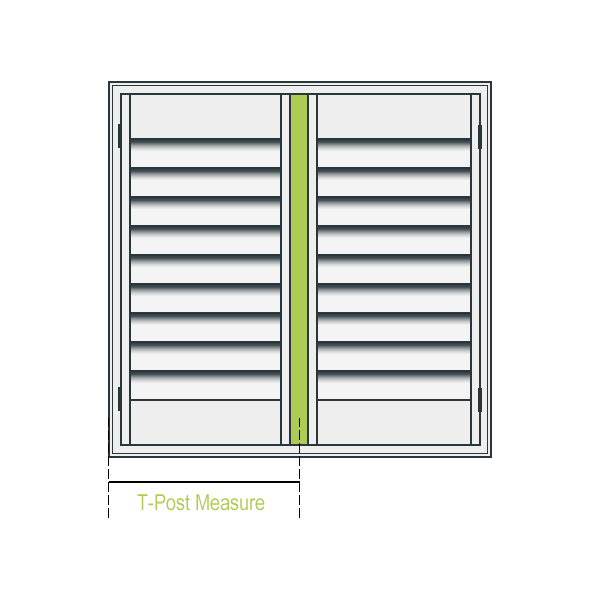
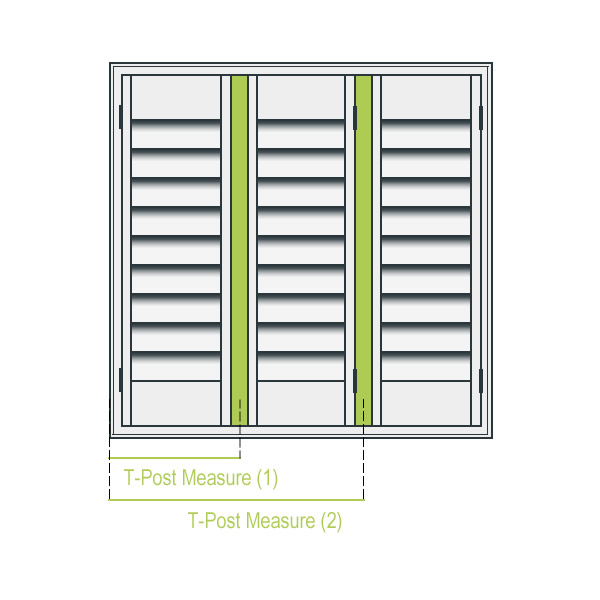
2.2.2 – Face (Out) Fit – L Frame
Explore below the different options for T-Post positioning on a Face (Out) Fit – L Frame.
Measuring Face Fit T-Post Position Single
Measuring Face Fit T-Post Position Multi
T-Post 1 = Outside edge of architrave to centre of first T-Post
T-Post 2 = Outside edge of architrave to centre of second T-Post
3 – Check Number Of Sides Of Frame
Shutters with frames have 3 or 4 sides, which will be noted in order sheet, All of the frames can be made in three or four sided frames. The most common is a four-sided frame. LRBT stands for Left, Right, Bottom and Top frames.
Shutter Frame 4 Sides (LRTB)
Shutter Frame 3 Sides (LRT)
DIY Shutter Installation Guide
Your installation will go very smoothly once you understand the steps involved and follow them one by one. So make sure to give them a good read before starting your installation. By taking the time to thoroughly understand the process, you’ll be able to tackle your project with confidence and get those beautiful shutters up in no time!
Check the packaging box carefully before open the packaging, see if there are any transport damages.
Check the carton outside label to find out the location of the shutters.
Do not dispose of packaging until shutters are operating appropriately.
Find working space to assemble you frame (preferably in front of the window).
Carefully remove panels and frames from the packaging, check the packaging label (with X mark) to find out the location of following hardware.
Do not mix panels or frames from other windows.
How to Check Measure?
Video Guide
How to Assemble Shutters?
Video Guide
Kit Installation Guide
How to Replace Damaged Louvre?
DIY Shutter Measuring Specifications
Whether you’re a DIY enthusiast or a professional woodworker, we’ve got you covered with detailed specifications for materials, measurements, and assembly. Explore our specifications below for more detailed information.
Shutter Measuring Specifications
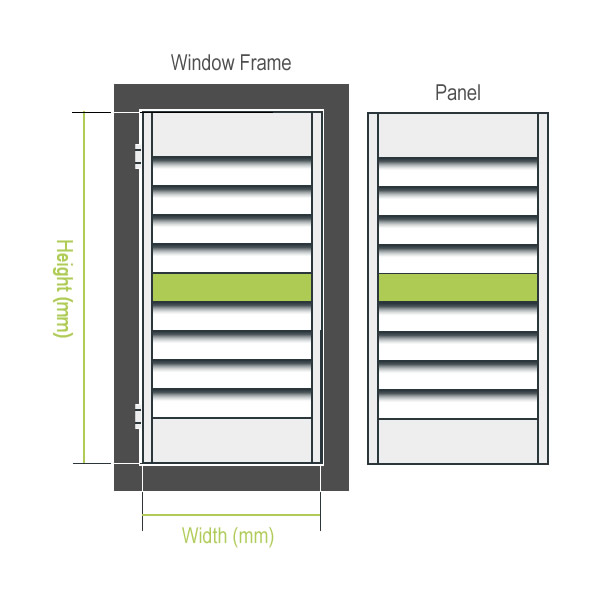
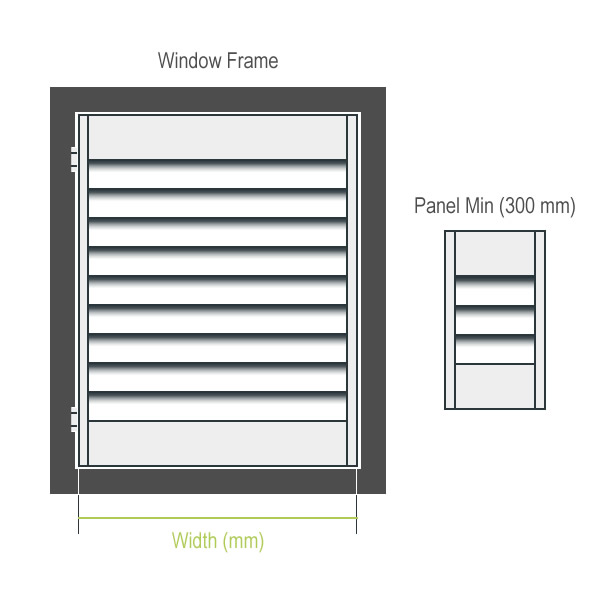
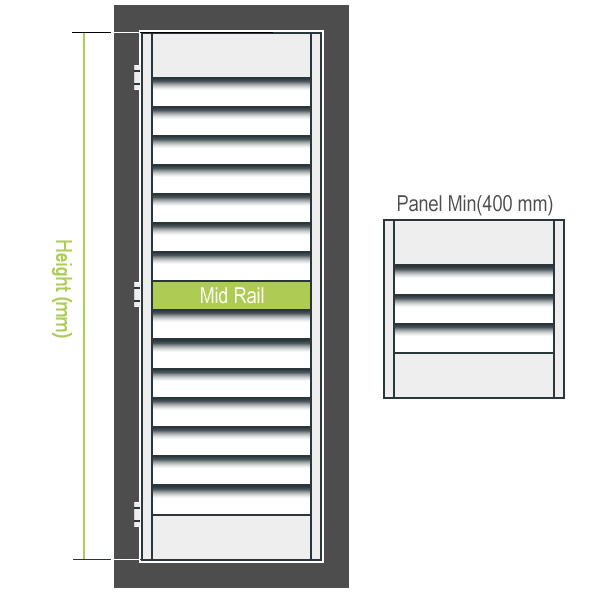
Shutter Width and Height Specification
Shutter Specification
Product
Painting
Colors
Process
Application
Timber
Water-based
White
Finger Joint
Interior
PVC
Water-based
White
Extruded
In/Exterior
Shutter Width
Panel Width Limitation
Materials
Min width
Max Width
Timber
250mm
950mm
PVC
250mm
900mm
Shutter Height
Panel Height Limitation
Product
Min Height
Max Height
Optional
Mid rail required
Timber
400mm
2800mm
<1800
1801-2400mm
PVC
400mm
2500mm
<1600
1601-2100mm
Panel width and height over maximum limitation or without mid rails, buyers are defaulted to give up warranty.